Phew! It took 4 hours for me to complete this tutorial. Hope this can help you a lot! Feel free to drop a comment if you got any question or ideas to share.
Don't forget to share your artwork with me when you've learned this!
Okay, here's the steps!
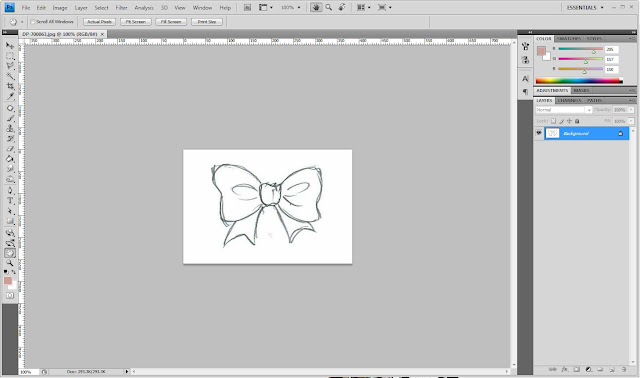
1) Get anything you want to paint from anywhere; mine, I draw on a piece of paper with pencil and scan it into my computer. So, here's the scanned ribbon.
2) Download any pattern you like anywhere in google. But I have my own favorite collection here. You can use them by right click on the image > Save image as and directly save it in your document. But remember, click the image first to ENLARGE it otherwise, the image that you'll save will be just the thumbnail and it wont look good later!
3) Once you grabbed your favorite pattern online, open them in Adobe Photoshop. Now, I'm using Photoshop CS4. To open in Photoshop, simply click: File > Open and locate your pattern in your file.
4) Then, click Edit > Define Pattern just exactly what the diagram shows below:
5) As you clicked it, a box will appear. This box is for you to give your pattern a name so you can remember it at time you want to use it later.
6) This pattern, I named it as 'mystrawberrypattern_by finieramos.jpg'
7) Then, you may close this pattern file by clicking the X button just exactly like on the diagram below:
8) Next step, we are about to put the pattern onto our scanned drawing. In Photoshop, click File > Open and locate your scanned drawing.
 |
| This is my scanned ribbon that I draw just now. Now it's in Photoshop. |
10) When you got it, the layer called Background will automatically rename as Layer 0 with the other panels active and clickable. So now, click Normal drop list and choose Multiply.
11) Now, click Rectangle tool on your tool bar. If you can't find your tool bar, check it on the Window menu just as how you find your Layer panel. If you there's no Rectangle tool in your tool bar, hold your mouse in the Shape icon and the list of the shapes will appear. The shortcut of this tool is U.
12) Create a rectangle shape on your drawing. Then, you will see that the rectangle is covering your drawing. That's because the rectangle's layer is on top of your drawing's layer (which is named as Layer 0) on the Layer panel.
13) To make the drawing visible as well as the rectangle shape, drag the rectangle's layer down so Layer 0 can be on top of the shape. Faham ka? Heheh...
 |
| Drag Shape 1 layer |
 |
| Now you can see the transparency. Because of the Multipy setting that we've done one step no 10. |
Click on your pattern then click OK button (6). You can see the changes straight away (7).
You can also set your pattern size at the same place. Check the diagram below. Whenever you made changes, you can see the live preview on the stage.
15) After you satisfy enough with the pattern style. Click OK button. Then, right-click on Shape 1 layer on the Layer panel and click Convert to Smart Object.
Remember! Once you convert the shape to Smart Object, you will no longer can change the pattern's settings. So, make sure you satisfy enough before make the conversion. But don't panic, Edit > Undo can save your panic.
16) As your shape converted to a Smart Object, click on the corner of the pattern on the stage just as how you want to resize it. Then right-click on it to make a list box appear. You can choose either on that I've circled in red there. But I usually use Warp so I can reshape the shape freely. Try it.
17) This is how its gonna be when you warp it. You can reshape it just like a plasticine. Once you happy with the shape, click the button that I pointed in red shown on the diagram below.
The reason why I WARP the shape is to make it even more realistic. You can see it in you real life shirts, the crumples of your clothes will make the patterns aligned freely.
18) Now, we want to remove the outer parts over the drawing. Click your Shape 1 layer and click Add vector mask on the bottom of the Layer Panel. Then, a white square thing will appear next to Shape 1 just exactly how it shown on the diagram below.
19) Then, your Brush tool to erase the unwanted part of the pattern. Make sure you are now in the Mask layer. You can get a Brush tool in the Tool box. Right-click on the stage to set your brush settings like the diameter of the brush and the hardness.
Now you can start erasing the unwanted part. Click the diagram above to read the notes so you won't face any extra errors or problems. Hope it works.
Check the diagram above. Notice the Mask box of the Shape 1 layer? The dark spot of it is the part where you erase the unwanted extra patterns using the Brush tool.
If you accidently erased the wanted part of the pattern, simply CTRL-Z to undo it OR just click X on your keyboard to change the brush masking and start un-erase the part. Click X again to continue erasing the other parts. Well, that's the shortcut key.
Repeat step no. 11 to continue patterning the other side of your drawing!
But wow! We haven't done yet. It may look pretty but not realistic enough! Now we need to add some effects by adding shadows on it.
20) To add shadow, create a new layer. Still on the bottom of Layer 0. Make this new layer as Multiply (check step no. 10).
21) We use brush tool to make the shadow. Just as how you apply shadow effect when you're painting traditionally on a piece of paper.
22) Choose a similar color of the pattern. But a bit darker. Well, understand the shadow principal in painting. To change the color, double-click on the color box and start choosing the color from the Color Picker box.
Make sure you are painting on Layer 1!
23) Before start painting the shadow, make sure your Brush setting is suitable. Here, the most important settings are the Opacity and the Hardness of the brush. So, start painting!
You can change the Opacity of the brush if you didn't see the color appear.
Now, see the differences with and without the shadows.
Okay, now you can try it by yourself! Try do on a simple object first then when you master enough with all those steps, you can start painting a complex drawing. Do more research and experiments and you will find more cool stuffs!
Here's my 1st work with Define Pattern.

 Click to join my contest!


9 comments:
tengs so much finie,I'll try to spend my time during this semester holiday to get into this thingies :)
Welcome, dear..don't forget to share your final work with me! <3
like this tutorial...thanks ^ ^
Interesting! Will comeback here to refer to this the next time I do some photoshoping!
Thanks everyone~don't forget to share with me your final artwork! :) Goodluck!
oh, segan mau share..artwork yg x brapa artistic..
hasil kerja tunjuk sama Cikgu Finie :)
oh my... u really done making this tutorial..
Terima kasih la byk2 =D
will try it~~
mcmna kunun tu komen hari tu? letak ja 'define pattern' d layer blkg?
susah ni kalau sifu xda d tepi. tp xpa, ak try buat dulu.. hihi.
huh?ya..layer yg ada pattern tu letak d belakang dn layer utk line pencil tu kasi 'multiply' dia supaya dia tembus mcm lutsinar/lutcahaya.. :D
*paham ka?sy pn cm xpaham penerangan ni..heheh..
tp artmork tity tu okey suda tu..ngam!
Post a Comment